Tuesday, December 30, 2008

Buy-Buy!!!

I ordered two really cute clear stamps sets from Oriental Trading Company. They arrived today:

The first set is called "Build-a-Cake" and has all kinds of cakes and icings and cupcakes. That should be fun. The second set is a baby set that I thought was too cute to pass up. I love the little faces.

This is really hard to see in the picture below, but instead of a "Bye-Bye" stamp, my set says "Buy-Buy"! Ha! Ha! I got a big charge out of that! I called up ol' Orential Trading Company to let them know mine is WRONG. I don't want to return it because I think it's such a cute set, and that's only one tiny little stamp. However, they probably should know they're selling defective sets. The rep. looked it up on the internet, and it says "Bye-Bye" on the internet (and I just checked and it DOES say the right thing on the internet picture)! However, because I had a problem with it, she issued me a $20 coupon to be used sometime within the next year.


Now I need to figure out what I can use a "Buy-Buy" stamp for--surely there's SOMETHING!

Monday, December 29, 2008

I'm drowning in paper!


I'm sick in the head. I bought more paper yesterday at Michael's. I couldn't resist because #1. it's so pretty and #2. it was on sale. I bought two sets. One is French country-looking and the other is Modern/Contemporary.


Sunday, December 28, 2008

Bookmark Tutorial

Ibisisis on Craftster.org asked for a bookmark tutorial. I don't know of any so I thought I'd post my own. These are very easy to make, but they look nice. Here goes:
1. What you need for these bookmarks:
  • 1 piece of cardboard 1.5 x 6"
  • 1 piece of paper 2.0 x 6.5" (the sky's the limit on what kind of paper. Recycled magazines or calendars are cool as is a plain old newspaper; I'm using handmade paper in the example below. You can also use fabric--see the last photo for an example)
  • 1 piece of paper 1.25 x 5.75
  • White glue (I love Aleene's Tacky Glue, but any kind will work)
  • Foam brush
  • A hole punch
  • Pretty ribbons or fibers (not shown)
  • Eyelet (optional)


2. Cover one side of the cardboard with a layer of white glue:
3. Lay the glue side down on the larger piece of paper, trim out the corners like this (I forgot to photograph this step so I used a scrap piece of paper to demonstrate):


4. Cover the opposite side of the cardboard with white glue and fold the edges of the paper up to the top:


5. Next, place the smaller piece of paper on the glue-covered cardboard:

You can see I went a little wild with the white glue, however, Aleene's Tacky Glue dries clear so it won't be noticeable when it dries.


6. Punch a hole at the top. Add an eyelet if you want:


7. Tie fibers and ribbon through the hole, and you're finished!


Below are some bookmarks I made this morning. The orange one is some cool batik fabric.


Saturday, December 27, 2008

More Blog Hits

Explain to me how these blog hits work. Out of a week, I'll have 2, 2, 1, 3, 5, 2, 800 (slight exaggeration). Today's 39 (so far) are from all over the world.

[Edit:] I ended up with 58 hits yesterday! See! Where are all of them coming from!?

Card Parts and New Year's Cards

I've been busily piddling around in the garage shop. Rather than full cards, I've been making card parts that I hope to use on cards at a later date (or maybe I should sell them on Etsy: http://www.thelaserbeam.etsy.com/).


Here's what I've come up with so far (there are a couple of others that didn't fit in the picture):


I also worked on some New Year's cards. There were a couple of people who sent me Christmas cards whom I didn't sent a card (and they sent them too late for me to return a card). So, I made New Year's cards that I could send. I worked really hard on a silver glitter card, but I just wasn't very happy with how it turned out so I made a different card out of yellow and red that I laser-cut "Happy New Year" and "2009." I'm much happier with the second card.


Here's my silver glitter 2009:


And here's the red and yellow card: I like that the stars overhang the edges of the card. I popped dotted them off the card, too, to make them stand out.

Tuesday, December 23, 2008

The De-Stash-a-long...

So, people on the de-stash-a-long want to have monthly THEMES. For example, they want to do a color. Which is ridiculous because there's a Color-a-long already so why don't they join that instead?

Anyway, at first, I thought "UGH! That will actually PREVENT me from using up my stash because it's too restrictive." I even posted that I'm not so big on the theme focus and that I will probably do my own thing and post pictures as I de-stash.

However, this morning, I came up with a brilliant idea: if we're going to do themes, then why not do multiple themes each month: colors, textures, seasons, holidays, textures, trends, techniques, etc. That way it gives people plenty of opportunity to be creative, but not for just a single idea. I came up with a list:

January: winter, blue, argyle, owls/birds (which is trendy right now), crochet, etc.
February: Valentine's Day, quotes, red, winter (again), flowers, knitting, etc.
March: St. Patrick's Day, green, quilting
April: rain, birthdays, pink, stamping
May: Mother's Day, girls, spring, purple, sewing
June: Father's Day, boys, sports, ATCs, technique?, color?
July: summer, vacation, 4th of July, yellow, technique?
August: ocean/sea, Grandparent's Day (I think that's in August), green, technique?
September: Labor Day, back to school, totes/bags, color?
October: Halloween, fall, orange and black, other stuff?
November: Thanksgiving, leaves, brown, other stuff?
December: Holidays, snowflakes, color?, other stuff?

I left off beading and painting as techniques to do, and pets and weddings as other themes. No responses so far so I wonder what everybody will think? I let them know it won't hurt my feelings if they think all this is stupid, but I really think it's a good idea. The person who started the thread, "psyche," hasn't responded in a couple of days. I wonder what he/she thinks about themes?

Monday, December 22, 2008

First De-stashing project: mini cards

Yesterday, I worked some on de-stashing my scrap paper. This is what I came up with:


I made mini cards! Very, very cute. My goal was to use as little new cardstock as possible and not create any more scraps. The "many thanks" cards above are different sizes because I used up an entire 12x12 sheet of cardstock to make all 5 cards. If I'd been smart, I would have measured better so they were a consistent size! The good part is, though, that I had no waste at all! I need these cards for all the beautiful gifts we've received from our friends.

The mini cards below are just random scraps I had. Again, I didn't make any new scraps when I made those cards! Good for me!

Sunday, December 21, 2008

Okay... okay...

Well... I posted the photo of the garage, but I also have a photo of my stack of scrap cardstock. I'm embarassed to post it, but here it is (again, I hope that in sharing I'll prompt myself to DO something with all of this):

I keep it all stored in the cardboard trays that cases of canned dog and cat food come in. Shown above are two dog food trays and one cat food tray (the big pieces of cardstock that are definitely worth saving are in the dog food ones and the little scraps I should probably throw away are in the cat food tray). I use those trays for everything (as shown in the upper right of the photo!); they're VERY handy!

Garage Shop

I've joined a "De-stash-a-long 2009" craft-a-long on Craftster! I hope that sharing my paper crafting addiction will prompt me to use up more of my stash of cardstock, patterned paper, vellum, transparency film, handmade paper, rhinestones, ribbon, eyelets, brads, beads, rubber stamps, glitter, buttons, punches, stickers, wire, flowers, embellishments, paint, etc., etc!

My first goal is to make a huge dent in the amount of scrap cardstock that I keep accumulating. I just can't throw away any scrap cardstock, no matter how small a piece it is. I keep telling myself: "I might be able to use that on someting else" and so I save every little scrap! Not good!

Second goal is to figure out how to use up all that patterened paper I have. I'm just not good at using that, but I keep buying and hoardng it (along with all the other supplies I have). The good news about hoarding is that I don't buy ANYTHING unless it's on sale, and then I buy it even if I don't need it (thus the addiction!).

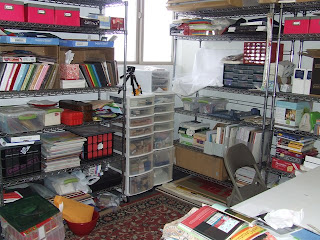
Anyway, here's a photo of my garage shop that's LOADED with paper crafting stuff. I'm totally cringing as I post this!

Wednesday, December 17, 2008

Merry Christmas Cards

I wrote out my Christmas cards over Thanksgiving weekend, but I didn't get them in the mail until last Friday. I had hoped to include a picture of the nine of us, but that never happened. Maybe next year.


The cards I mailed out were ones we made at the Christmas card party in November. I laser-cut the design. It's a Microsoft clipart, and is a very, very cute card:


However... I still have to mail cards to the ladies who were at the Card Party. I wanted to do a different card than any of the ones they saw at the party so I made a new card this morning. It's way cute, too. Hard to see in the picture, but the white background is embossed with a paisley design. I was going to do Swiss Dots, but changed my mind at the last minute. I printed the "Merry Christmas" on transparency film. This was SUCH an easy card to make, but I think they'll like it!


Saturday, December 13, 2008

Long-Arm Class!

Yesterday was my long-arm class! How much fun is that?!

First of all, they had me square up the backing by RIPPING it down the edges. They were pleased that I'd made the backing so much bigger (4" wider and 6" longer) than the top so I had plenty of room to rip. It was pretty square si the strips I ripped off were pretty small.

Next, I had to pin the fabric to the canvases. This was the "hardest" part of the whole process.

To start and stop, you have to tack the thread in place and pull up the bobbin thread. Then you roll the canvases to the next section, check that the design won't overlap the previous quilting, smooth out the layers with a yardstick and start all over again.

I initally wanted to do a stipple design, but they had a meandering loopy design already out, and I liked it so I used it instead. My loops are pretty good, though some of them are more square than circular because I wasn't so smooth with my movements.

And, speaking of movements. The stinking machine didn't have a stitch regulator! I can't believe that. If I spent that much on a machine, I'd expect it to have a regulator on it! Anyway, some of my stitches are VERY close together and some of the are VERY far apart when I couldn't keep moving at the same pace.

Also the lady picked out a verigated thread to use, and I really liked what that looked like (besides which, I have a spool of that same thread that I bought at Joann's when it was 50% off, and I can use it for sewing on the binding).

My quilt was 49 x 62, and I finished it in the alotted two hour class time. Hours beyond class time are $15/hour.

Friday, December 12, 2008

Just Cards magazine

Yesterday, I received a complimentary copy of Just Cards! magazine. I didn't know why they sent it to me because I hadn't submitted any cards for that issue. However, I dug through it, and found they'd published three more of my cards that I'd initally submitted for the previous issue! How exciting! That means out of 8 of the cards that I submitted, 6 of them were published!

Last time, they sent me a litte 2" strip of paper to let me know the cards had been selected. This time, they wrote me a nice letter (granted it's a generic letter, but it's better than a little strip of paper!).

The next deadline (for Volume 13) is Friday, December 19. I have THIRTY cards to submit! That's a lot, but I figure if I inundate them with cards, SURELY they'll pick SOME of them, huh? I hope so!

Last Five Cards

Here are the last five cards that I made to be submitted for Just Cards! magazine.


Thursday, December 11, 2008

Other Cards

Below are just a few of the other cards I made. I'm submitting so many that SURELY some of them will be chosen for publication? At least I hope so!

I have all of the directions typed, cut out, and attached to the backs of all of the cards I've posted today. I have 5 more cards I made today that need directions typed out, and then I think I'm finished. I'd like to take them to the PO tomorrow when I go to downtown Richland for my long arm class.


Sympathy Cards

Below are the sympathy cards I made. My favorite is the last one.


New Just Cards! Submissions

The deadline for Volume 13 of Just Cards! magazine is next Friday, the 19th. I've been working on cards to submit, and have come up with some cute ones. I'm NOT good at working with patterned paper, though, and I've had to force myself to try using it. Below are some of my attempts. The birthday present one is made from fabric from Jo-Ann's.


Blog Hits...

I'm not sure what happened, but this blog got over 80 hits on Monday! That's about 2 month's worth. I can't' imagine WHAT happened!???

Monday, December 8, 2008

SewConnected Quilt Blocks


Here are my newest "Eclectic" blocks! The first one was inspired by the block that Jacquie G. from Tall Grass Prairie made for me. I really like that it's a rectangle within a square. I think that's unusual.

Second is a scrap block made from all the scraps people are returning to me.

Third is a block from the Japanese Quilt Blocks book that I have. I can't remember the name of the block, and the book is upstairs.

Fourth is a 45° angle block that I cut with my rotary cutter (rather than on the laser). It turned out nicely!

And finally, my favorite! It's a crazy nine-patch that I made with templates. I cut up a square out of paper then added 1/4" around all four sides (I got to use my new rotating mat, and I LOVE it!). I really like the little 1/4" brown border. It was only supposed to have the Kona bone as the outer border, but I miscalculated and ended up with an 11-1/2" block. I like the Surf and Sand border so it doesn't matter that I messed up a little! Anyway, another reason I like this block so much is because these are all 9 fabrics that are in the quilt.